
As you may already know, computers work only in 1s and 0s. If this is new to you, please read the article here to get more information on how that works.
Intro
once you have read about binary, let’s continue. Using binary in our daily lives on the computer would be time-consuming and frankly almost impossible to work with (without error of course). Therefore, our computers do all the binary processing and then convert it to more readable formats for their users.
Take a character on a word document for example, by typing out the “byte” of bits to represent the letter “A” would take much longer than us just typing “A”, right? how about an image, try typing the bits used in creating your favourite picture, it’s probably in the billions if it was taken with the latest smartphone. Systems, therefore, have been developed around this concept of storing data in different formats to be more accessible to its standard users.
Key Term: Character – text, number, and symbols. For example, each key on a keyboard.
Checkout my TES Shop for premium resources

Text, Numbers, and Symbols
As of now, there are two main systems that represent our text and numbers on a computer, these are Unicode and ASCII. ASCII is only 8 bit, whereas Unicode is 16, meaning ASCII can only represent 256 different characters and Unicode, developed in 1988 can represent up to 65 536 (216) characters. Every character, regardless of the system in use, is represented by a static string of 1s and 0s (e.g. A is 01000001)
ASCII will take up 8 bits, or 1 byte in memory. Unicode will take up 16bits, or 2 bytes.
To represent the sentence “I love Computer Science” in ASCII, we would use the following table:

Now, if you really wanted to convert manually, we would start with the first letter of the sentence, I, locate that in the table and then work out the binary value for the decimal number. In this case:
I = 73 = 010001001
I won’t do all of that here, it will take up too much space! however, you will end up with this
01001001011011000110111101110110011001010100001101101111011011010111000001110101011101000110010101110010 01010011011000110110100101100101011011100110001101100101
It doesn’t look great, but a computer would be able to process this no problem, interpreting it as the original sentence, “I love Computer Science”. Cool, huh?
Here is a website that lets you instantly convert sentences into ASCII code – branah.com/ascii-converter
Pictures/Images
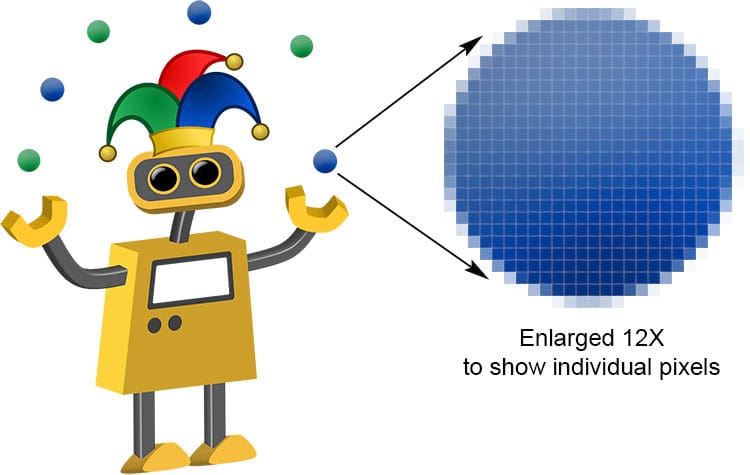
Since the inception of the GUI, images play a big part in the computer experience. Nowadays, images are commonly stored and viewed on computing devices. Images are analogue, however, computers can only work with digital, therefore, some processing needs to be done first when capturing your beloved pictures.
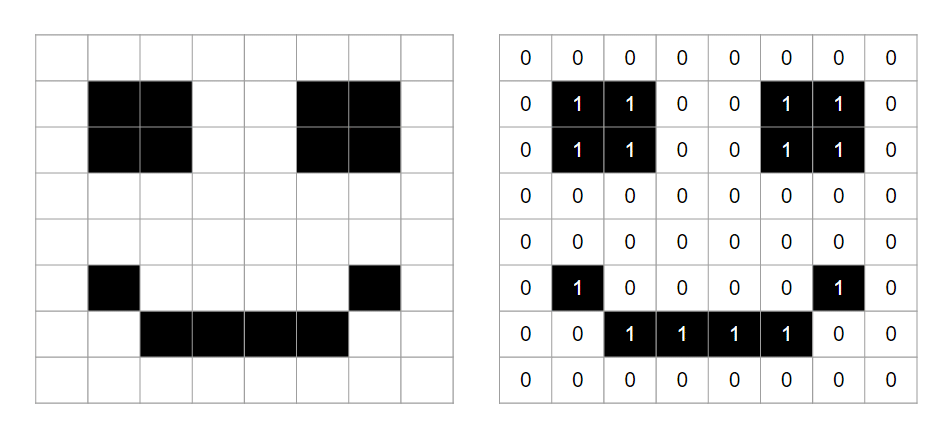
Images are made of pixels. Pixels are tiny dots of colour on the screen. Let’s take a completely black and white photograph. A 1 could represent black, while a 0 could represent white.
Let’s enlarge an image to see how “pixelation” occurs.
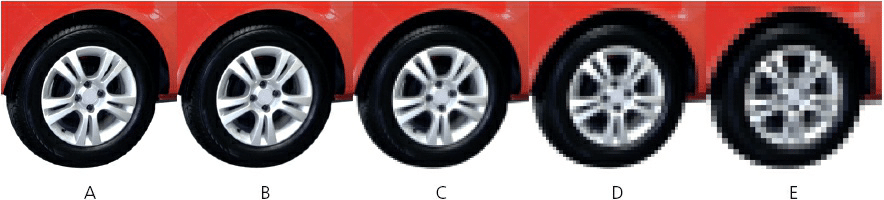
The resolution of the photographs is reduced from A to E. When we enlarge an image pixelation occurs due to the limited number of pixels within the image. Photographs A and B are very sharp whilst photograph D is very fuzzy and E is almost unrecognisable (not unlike an old 90s video game sprite!). This is the result of changing the number of PIXELS per centimetre used to store the image (also known as reducing the PICTURE RESOLUTION).
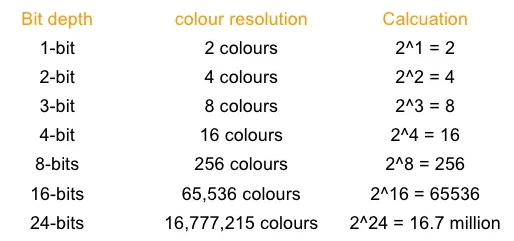
An image that is 1024 pixels wide and 768 pixels high is equal to 1024 × 768 pixels; in other words, 798,720 pixels. This is often referred to as a 3-megapixel image (although it is obviously slightly larger). TIF or BMP are the most common file types for images. The file size is determined by the number of pixels which we can work out easily by multiplying the resolution by the colour depth. In the previous example, a 3-megapixel image would be 3 megapixels × 3 colours. In other words, 9 megabytes (each pixel occupies 3 bytes because it is made up of the three main colours: red, green and blue). More colours mean a larger file size, depending on the “bit depth”.
Colour Depth
TIFF and BMP are the highest image quality because they are not in a compressed format. However, JPEG images are slightly different to BMP and TIF as they are “compressed”. We will look at that in more detail at the end of this page.
Images follow the RGB colour scale, in which each pixel is made up of varying amounts of Red, Green, and Blue to create the different colours you see. This is why image sizes can become especially large because the more colours you want to represent the larger the bit depth, and ultimately, the file size.
Checkout my TES Shop for premium resources
Sound
All sound we hear is analogue, but due to the digital nature of computers, they need to convert it in order to be able to process it — just like images!
the typical way would be to record some sound using a microphone then the computer would convert the sound waves into binary. How does it do this? sampling. at set intervals, the computer records and converts the sound at that point in time to a binary value. If the sample size is higher (i.e. more recordings per second) it will increase the quality of the digital sound. A higher-quality sound can be achieved this way.
Samples rates are measured in hertz. 1 hertz is 1 sample per second. To put that into context, telephone communication with standard voice may be around 8000Hz while a CD of music is more likely around 44,100Hz (much higher quality)

In the image you can see a low sample rate (voice-over telephone) has fewer points of recorded sound (= lower accuracy), whereas the higher sample rate has more points of recorded sound. This creates a much more accurate representation of the analogue sound that was initially recorded.
Data Compression
Data compression is the process of manipulating a bit structure in such a way that it results in a file size that is smaller. Less storage space, therefore, is needed to store the resulting file and we can save space or more easily transfer these files across devices. The most common thing you may be thinking of right now is a compressed zipped folder, however, we will discuss some slightly different ways now.
Algorithms are used to manipulate the data. these are designed to find repeating data and then remove it. This can be temporary or permanent.
Key Term: Algorithm – a step by step list of intructions
Lossless compression
All data bits from the original file are reconstructed when the file is again uncompressed. This is particularly important for files where the loss of any data would be disastrous – for example, a word document, database, or spreadsheet file.
Lossy compression
Is very different to lossless compression. This technique uses a compression algorithm that completely eliminates unnecessary bits of data, for example, in MP3 and jpeg formats. It is impossible to retrieve the original file once it has been compressed. You should only choose this method for files where removing certain bits won’t reduce the quality.
As mentioned above, this type of compression is regularly done on audio, video, and image files, particularly when streaming them as the smaller file sizes can be transferred faster.
There are two types of encoding algorithms for lossy compression. Run Length Encoding and Huffman Coding. Depending on the syllabus you are studying you may need to use these. These algorithms are covered in more detail here.